How to download, customize and
upload
Crystal Cloud Graphics .zip files of web set templates
page 3
Even if you think your concern is an issue specific part below, be sure that is isn't something you didn't do in another section. So at least read through all the parts.
Part 1: Saving .zip file, opening .zip file and setting up the proper folders to store the files.
Part 2: Editing and customizing template.
Part 3: Creating a page from the customized template.
Part 4. Uploading files for proper viewing.
Part 3:
Creating a page from the customized template.
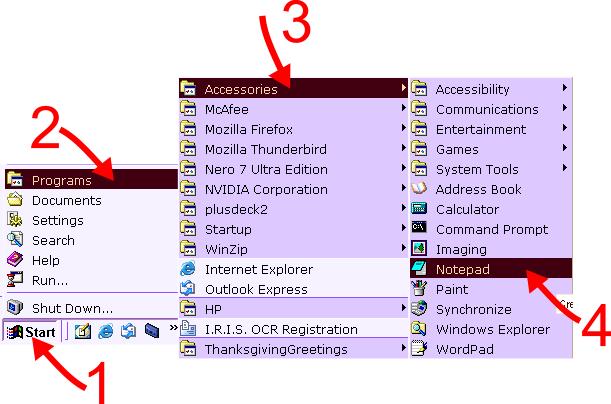
40. For this tutorial, I will start with the index.html I
created in Part 2 by preparing my own content. I do this in
Note Pad (it is under "Accessories" in Windows).Crystal Cloud Graphics .zip files of web set templates
page 3
Even if you think your concern is an issue specific part below, be sure that is isn't something you didn't do in another section. So at least read through all the parts.
Part 1: Saving .zip file, opening .zip file and setting up the proper folders to store the files.
Part 2: Editing and customizing template.
Part 3: Creating a page from the customized template.
Part 4. Uploading files for proper viewing.
Part 3:
Creating a page from the customized template.
41. Since this is an index page, (the entrance to a site) there are certain things to keep in mind when writing this page: Your visitors and search engines.
Visitors should see: What the site is about in an interesting way so that they want to look at more of the site. It's like when you go to a grocery store and they pass out a free sample of food, hoping you will like it and buy it. That is exactly what the front page of a web site is. So you do have to let them "sample" the site on the front page. Telling me that there is a product on isle five that is great is not as effective as giving me a little of the product right where I am and telling me if I want more to go to isle five.
Search engines want to see "key words" usually nouns and descriptive phrases.
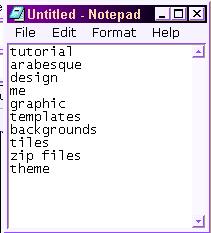
42. So, with Notepad open, I list what the site is about, starting with maybe ten nouns or phrases:
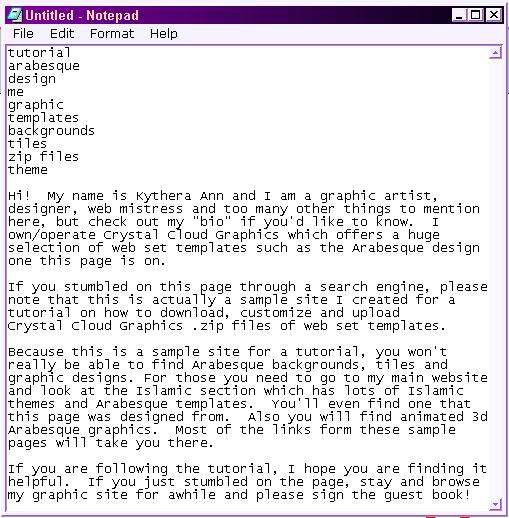
43. Now, still in Notepad, I write a 400-800 word article that gives a "free sample" of the site, tells visitors what more they can find and hopefully is entertaining. While I do that I try to use the list of words I created as often as possible. That's for the search engines. It's not enough to have a great site, people have to find it!
A site I designed, Valkyrie-Plot.com has an excellent interesting and key word rich index page. Check it out.
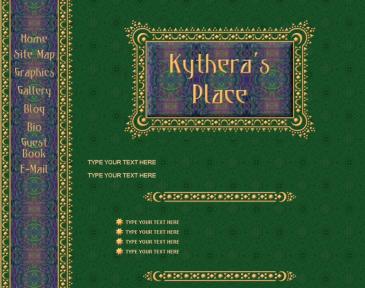
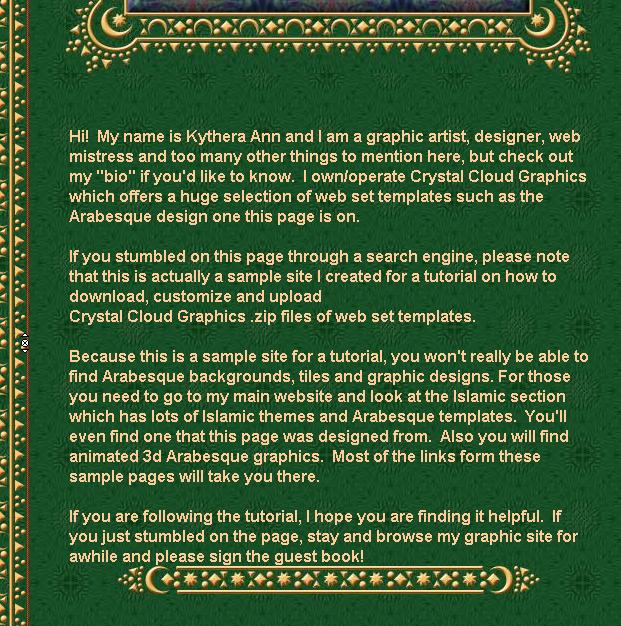
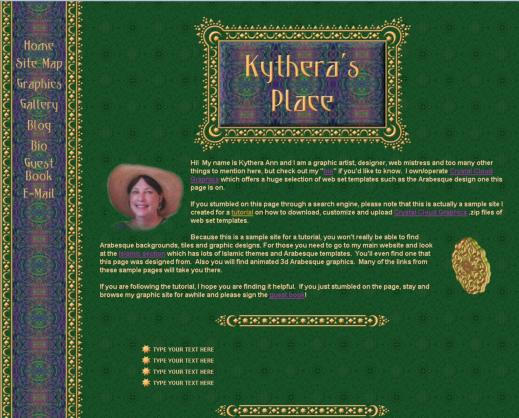
44. Open, in NVU or KompoZer the "index.html" file you created from the customized template in steps 37 and 38. How to open a file in these programs was shown in steps 15 and 16. Here is small pic of what the "Index.html" I created in Part 2 of this tutoroial looks like:
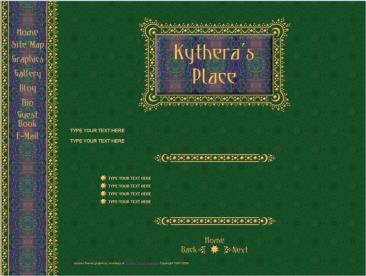
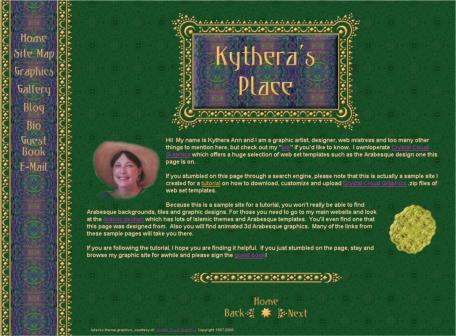
This page may appear that it has a lot more space to either side of the title image than yours. That is because my monitor is set for a 1280 x 1024 resolution and I viewed it in my browser at full width. About 50% of people set their monitors at 1024 x 768 resolution which would render the page so the graphics and text looks larger and therefore the empty space to the right and left would be much smaller. The same screen shot at the 1024 resolution makes the page look like below. Note that the page is now longer so I no longer can see the bottom of it without scrolling.
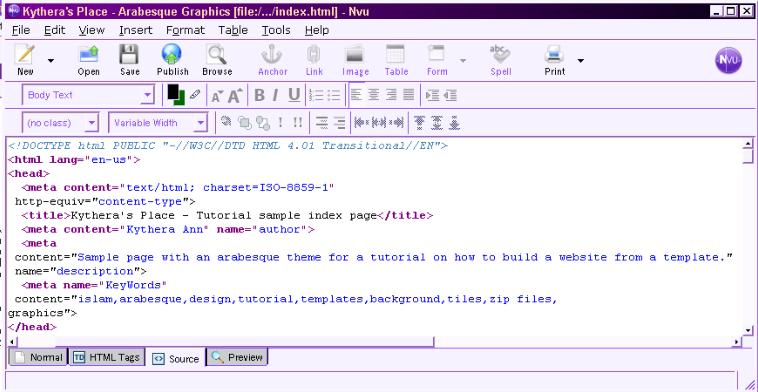
45. Once the page is loaded, the first thing you need to do is adjust the META tags to reflect the content you just wrote for this page. Review step 18 of Part 2 to remember how to do that. These were the results of my adjustments:
Remember to click the "Save" icon at the top of the program when you complete this.
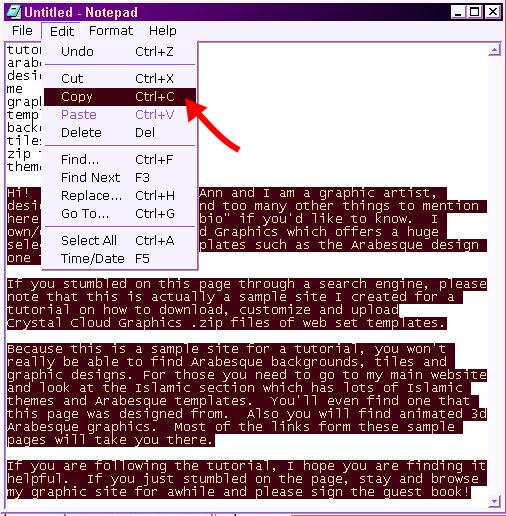
46. Now I can insert the text I wrote for the index page. First I highlight and then copy the text I want in Notepad:
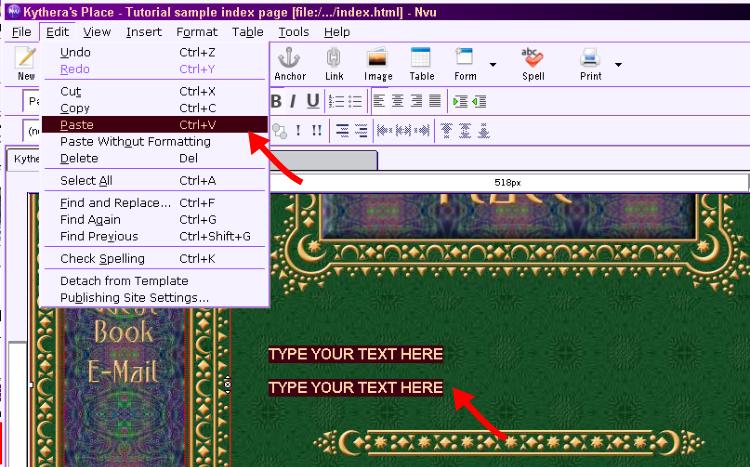
47. Then in NVU I highlight the text I want to replace that is there and then paste:
See how it automatically is default formatted?
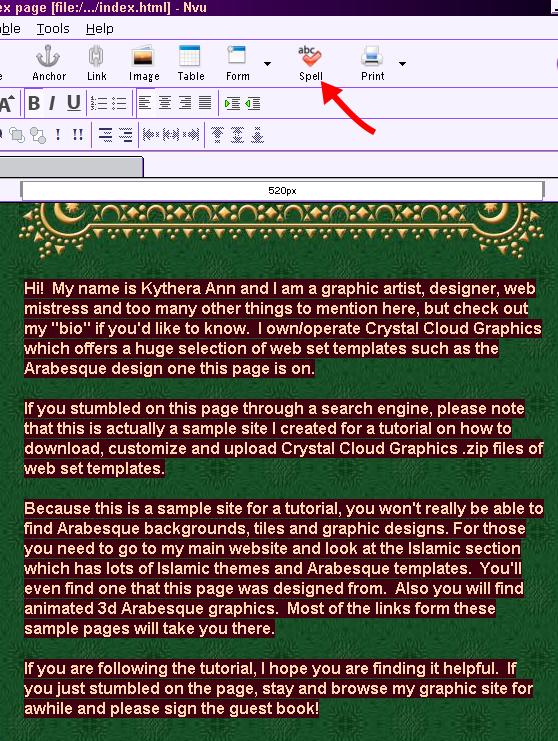
48. I need to tweak the text, add links and a couple of graphics I think. I start with taking a space out from under the title graphic, deleting the carriage return of the second paragraph and adding a space before the divider at the end of the last paragraph. Space deletion/insertion was explained in step 29. I also highlight the text I just pasted in and then click the "Spell check" icon at the top to make sure I didn't make any typos or spelling errors...I do that a lot, "wink".
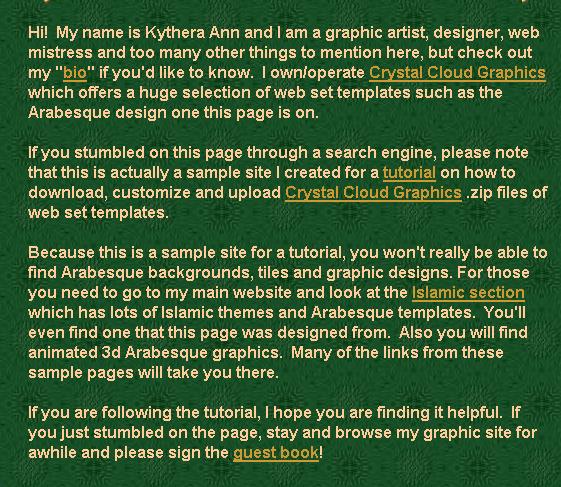
49. I now want to "hyper-link" certain word in the text. In other words, I want to make them "clickable" so that my visitors can go directly to what I am talking about if they want. To do this, I highlight the word I want to link and then click the "Link" icon at the top of the program. Review steps 30 and 31 if you need a refresher on what to do. My text is now hyper-linked:
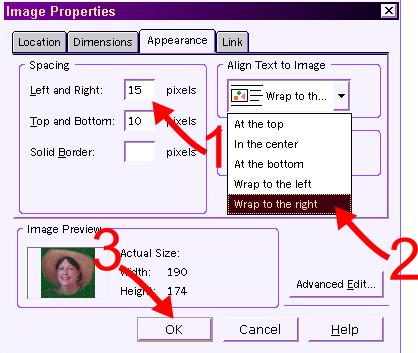
50. I put in my "images" folder in step 11 that I want to use on this page. Remember the image folder must be in the same file folder as your index.html, if it is not, only you will see your images ... no one on the net will! To insert an image, place your cursor where you want the image to go and click your mouse once. this will "set" the cursor on the page. Now click the "Image" icon at the top of the program and the "Image Properties" window will again appear. Review step 28 if needed. After finding my image and giving it an alternate tag, I also wanted it to appear to the left of my text with some space around it so the text didn't look crowded. To do this I clicked the tab called "Appearance." As shown.
51. A thumbnail of a full screen view of the page now looks like below.
Note that the second graphic I added is an animation. Animated graphics DO NOT appear to move in NVU or KompoZer, so don't worry. You will see it move if you view the file with your browser and when it is on-line.
52. The bulleted "TYPE YOUR TEXT HERE" I'm not going to use on this page, so I won't need one of the dividers either. I delete bulleted area is a table. I delete it as was instructed in step 33 and remove the extra space.
53. I'm done with the page now. It looks just the way I want it. I click the "Save" program icon on top.
54. I close that window on NVU. I'm going to work on the page which will link to the "Graphics" button of the sample site now. It is going to be an index, what is referred to as a "sub page index" it won't have any text, just links to the graphic sub pages I already created that were outlined in part 2 step 22. So I don't need to create text in NotePad this time. This page is the only other page I will show you how to build because it will have a feature not covered elsewhere.
55. What is the first thing I do after opening "graphicindex.html" in NVU? Adjust the META tags as in step 45 and click save.
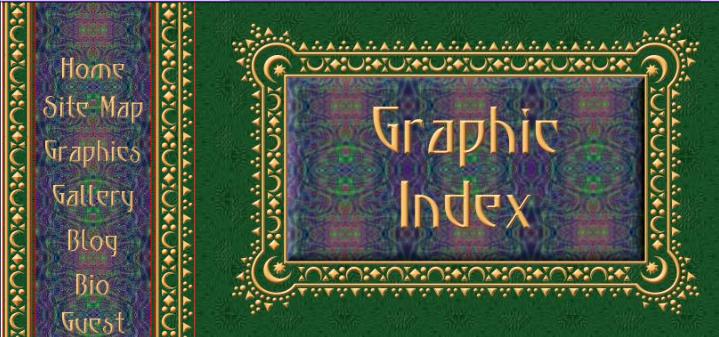
56. I want this to have a page specific title. So I replace the current title graphic with one I had already created and placed in the image folder for this site using the same steps as are in instructions 19 through 21 of Part 2. Here is the result.
57. Next I want to delete the "TYPE YOUR TEXT HERE" and that I typed over when I built the index.html because on this page I won't need that area. I also will eliminate the first divider as it is not needed. The simple "Delete" processes you were shown in other areas of the tutorial work to do that.

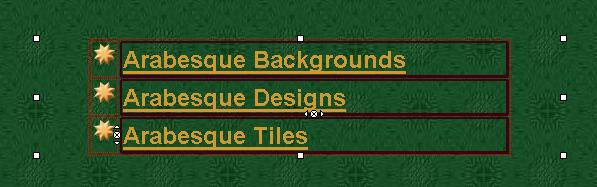
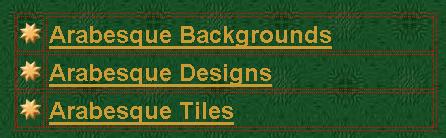
58. Now I will modify the bulleted list. First by typing over the existing text with the page names I want to use and linking the text. Similar to the step 30 and 31.
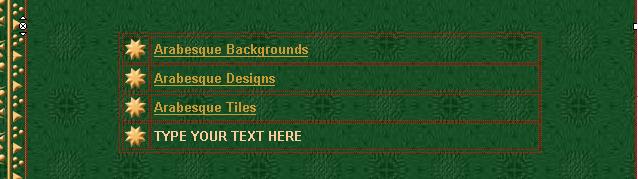
59. By the faint red lines NVU shows, one can see the list is actually in a table. I need to delete the bottom row because I won't use it. Step 33 taught how to do that.
60. I think the text is too small for an index list, so I highlight the text and experiment with clicking the large "A" at the top till I find a size I like. Every click makes the size larger, if it gets too big, I click the smaller "A" that is next to it.
It took me 3 clicks on the large "A" to get the lettering to the size I wanted.
61. I want the bullets to be centered to the lettering, to do this I need to modify table perimeters. To accomplish this, I click on a tale line then left click the mouse so that a menu appears, first moving the cursor to "Table Select" and then to "All Cells" and click.
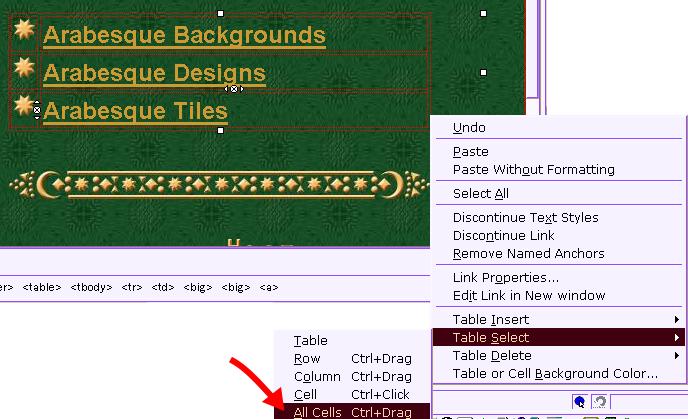
Now that the cells are selected, I again click on the edge of the table and then left click. A different menu appears. This time I select "Table Cell Properties"
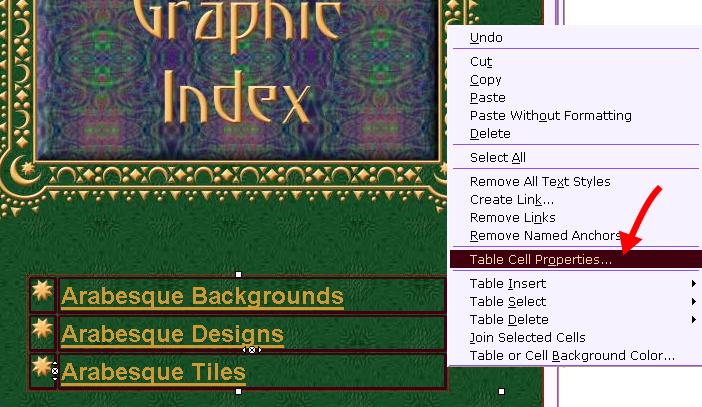
This opens yet another window.
1. Make
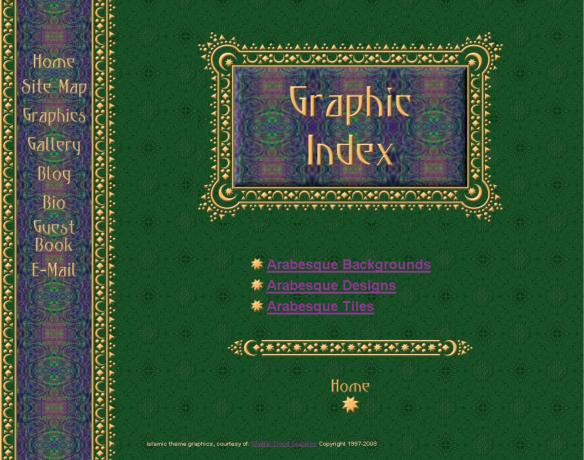
sure it says "column"
2. Make sure the width says "19" (this is the size of the column with the bullet)
3. Change the versicle alignment to "Middle" and check the box.
4. Click apply.
2. Make sure the width says "19" (this is the size of the column with the bullet)
3. Change the versicle alignment to "Middle" and check the box.
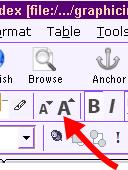
4. Click apply.
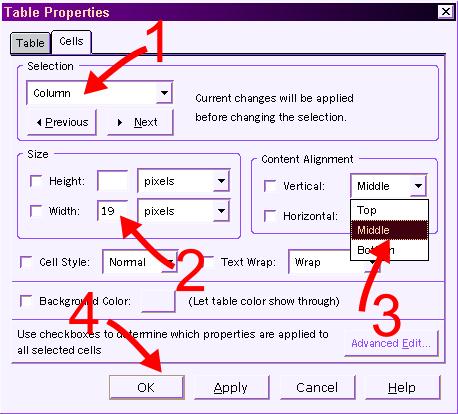
That moved the bullets down just enough for me:)
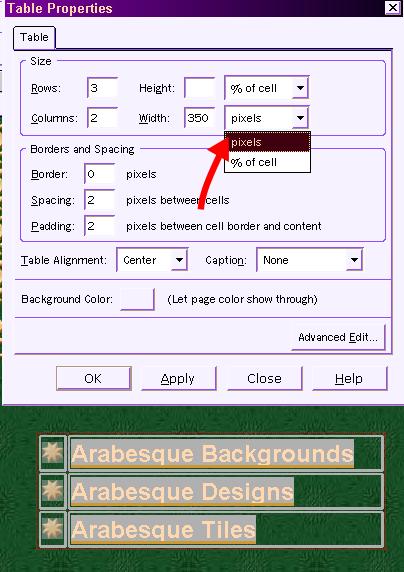
62. hmm...when I view the page full screen size the table is so wide that the list is not centered under the title.
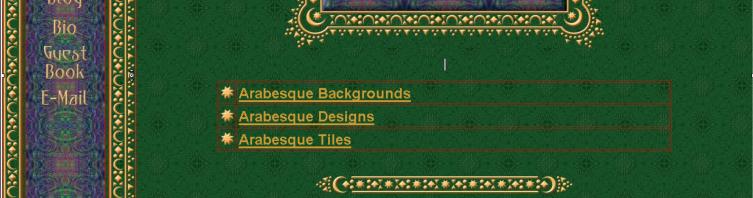
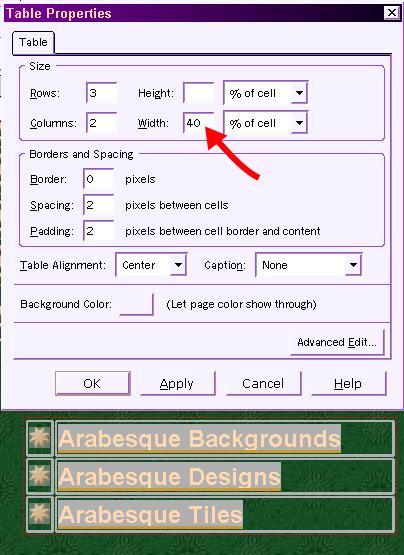
To change that I can click the table again and then left click it and select "Table Select" and then "Table" Then do it again selecting "Select Table Properties" When the "Table Properties Window appears, I see that the table width is set at 80% I change it to 40% and click apply, looks much better.
But when I collapse the window again the words are stacked, I don't like that.

So I open up the "Table Properties" window again. I change the width from "% of cell" to "pixels" and try "350" as the width. I like it and now the table won't change size or position no matter how it is viewed. This is called a "fixed" table, when it is a % it is called a "floating table" both have their uses.
63. The bottom navigation graphics. I'm not going to create any more pages for this sample site, so I delete the "Next" button. The "Back" button and the "Home" button would both go to the same place so I delete the back button leaving the "Home" button.
64. The page is ready to be "Saved" so I click the icon.
MISCELLANEOUS
ESOTERIC THEMES I RELIGIOUS/CULTURAL
TRADITIONS I WORLD
RELIGIONS
FAQ I TUTORIAL I SITE MAP I AWARDS I RINGS I LINKS I BIO I GUEST BOOK I HOME
FAQ I TUTORIAL I SITE MAP I AWARDS I RINGS I LINKS I BIO I GUEST BOOK I HOME
Crystal
Cloud
Graphics
is a home based graphic design and drafting firm that has been in
business
since 1978. It is owned and operated by Kythera
Ann.
If you would like to commission a specially designed theme or graphic
please
send an e-mail.
Web Host: ELYSIUMGATES.COM
If you experience any problems with this site, please contact the web mistress.
Copyright 1997 - 2008
![]()